This is a tutorial I shared for the Me Sew Crazy blog and now I am sharing it here. It is a tutorial on how I color blocked and added length to an old sweater that was just too short on my son. This can be done for t-shirts as well since hopefully we are heading into spring and leaving the colder months behind us! It is amazing to me how fast my son grows! I feel like I am constantly bagging up old clothes that are too small to donate to Good Will. It’s such a shame sometimes because while my son grows taller so quickly he doesn’t necessarily grow wider at the same rate. So all of these clothes I am tossing out still fit him in width but just not in length. I decided after this last closet clean up I would save some of his sweaters and shirts and see if I can salvage them. Here is what I did to add length and some fun color blocking:

Materials and Supplies:
- old sweater
- knit fabric for color blocking
- seam ripper
- coordinating thread
Step 1:
- Take your old sweater and grab your seam ripper and start ripping away! Take off the arms and neckband. Cut your sleeves and sweater front and back where you want your color blocking to be. Be sure to remember to add your seam allowance before cutting.

Step 2:
- Use the pieces you just cut as patterns to cut out your new pieces with your fabric you are using for the color blocking. To add length to my sleeves I added a white band. If you don’t want the added band in the middle of the sleeve you could just add length to the top blue piece. To add length to the front and back of the sweater I just cut my new pattern piece about 4 inches longer than the original sweater. Be sure to add your seam allowances to your new fabric pieces.
Step 3:
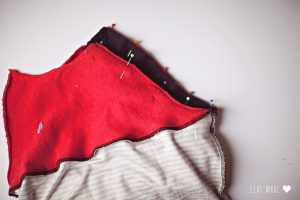
- With right sides together, sew your new bottom half of your sweater to the top original half of your sweater. Repeat for the back of the sweater.
Step 4:
- With right sides together sew the sides of the front and back of your sweater.

Step 5:
- With right sides together sew the top half of the sleeve to the middle band (or bottom half of original sweater if you are not doing the middle band). Then take the bottom half of the original sweater and sew to the middle band, right sides together. By using the bottom half of the original sweater we don’t have to worry about making cuffs for the sleeves or hemming them.

Step 6:
- With right sides together take your pin and sew your new sleeve to your sweater. Repeat with the other sleeve.
Step 7:
- Reattach your original neckband or make a new one by using the original neckband as a pattern.

Step 8:
Hem the bottom of your sweater and then you are DONE! Enjoy your new sweater!!

Here are some photos of my son rocking his new sweater. He loves it!


I hope this tutorial gives you some inspiration to think twice about tossing those old sweaters/shirts! As always, if you make anything from my tutorials I would love to see!